Tutorials
In this page we have prepared detailed instructions on how-to use the Fliteca Fleet management solution. Please select the topic, that your’e interesting:
Login and registration
In this tutorial, we will walk through the registration and login process for Fliteca, ensuring you understand what to expect and how to complete the registration.
Upon navigating to the Fliteca landing page you are greeted with a login form.

Once you have clicked the Registration button - fill out some basic information:
Password
Company name

After submitting your registration form, check your inbox (don’t forget to check your spam folder) for an email from Fliteca.
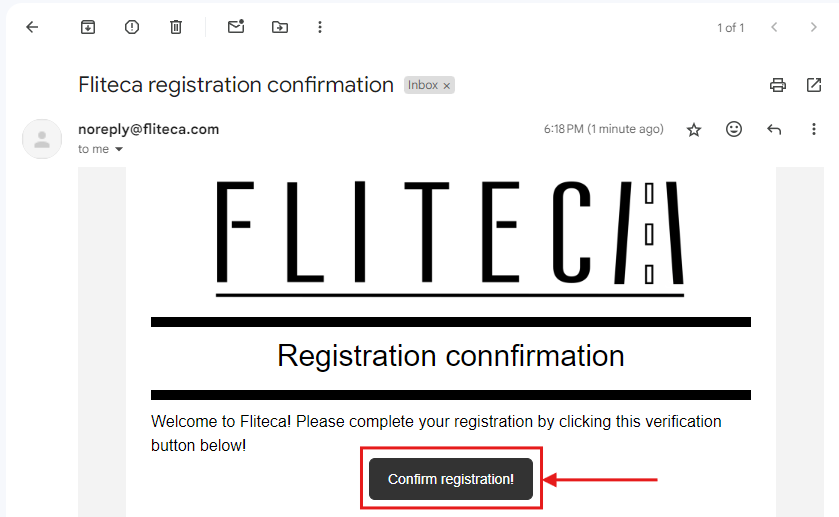
Click on the link in the email - you will be navigated back to the application and your registration is now finished!
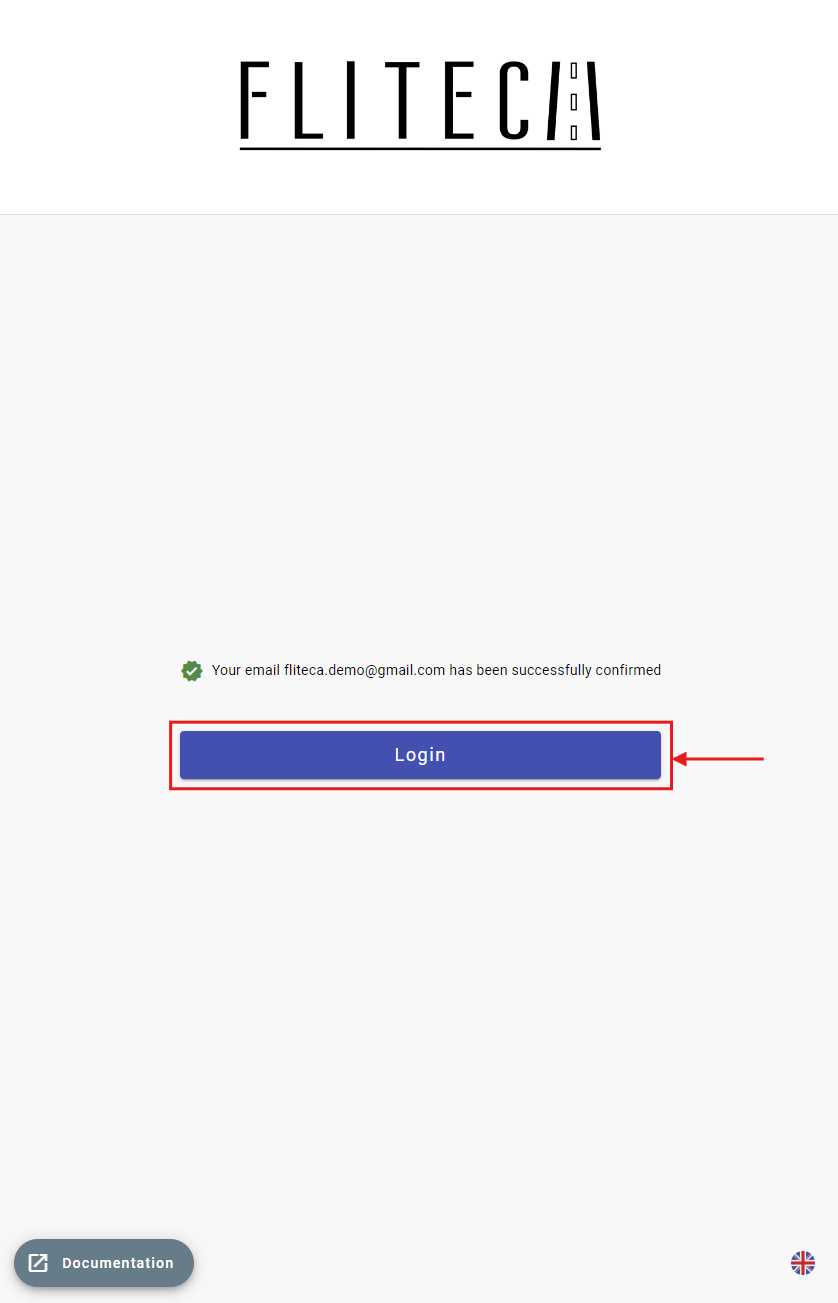
Enter your credentials in the sign-in form to log in to Fliteca.
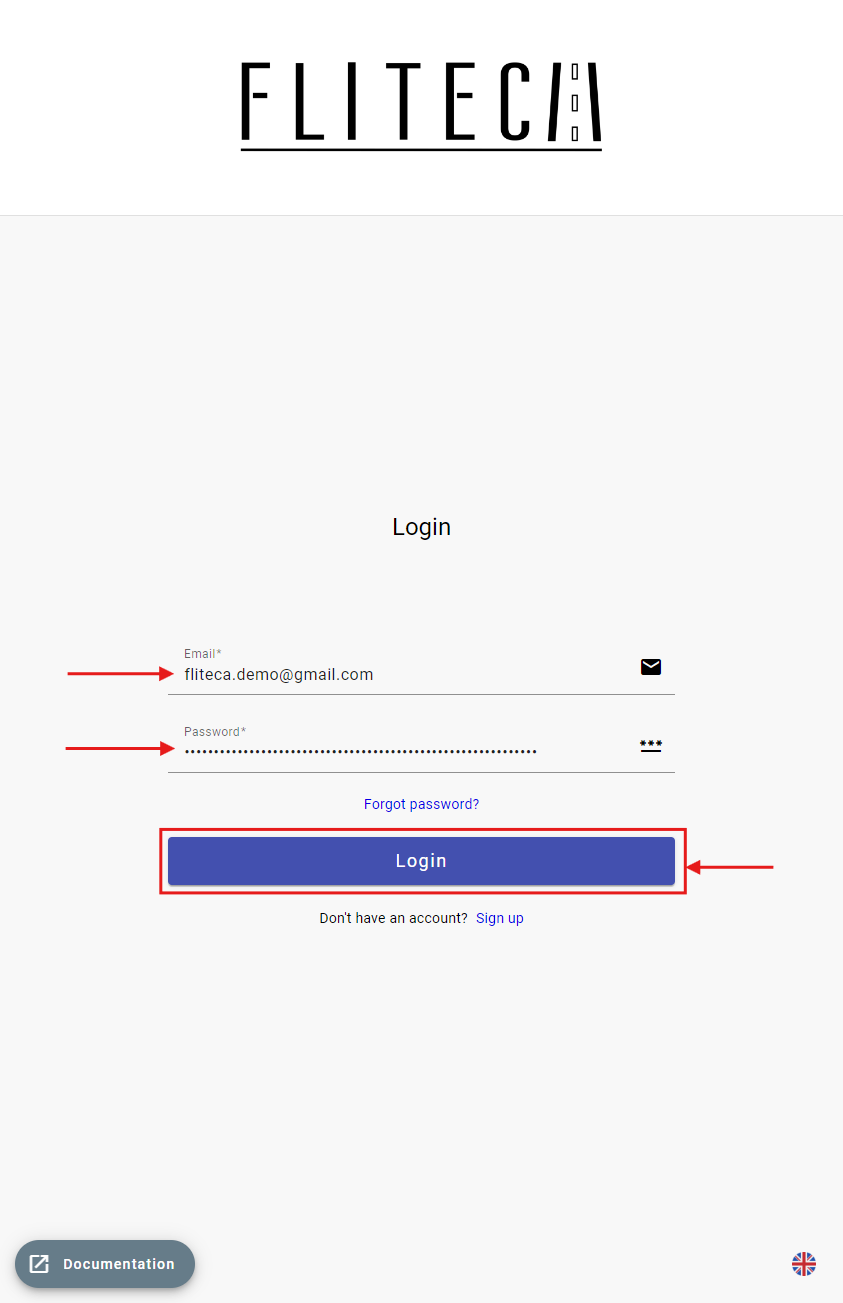
Once logged in, you can now explore all the features of Fliteca.
Happy tracking!
Geo-zones
In this tutorial, we will walk through the process of geo-zone management.
Geo-zones are reached in the “Geo-zones” section in the navigation bar. To start creating geo-zones, click one of the available draw options in the map sidebar:

Let’s walk through the different types of geo-zones available to you:
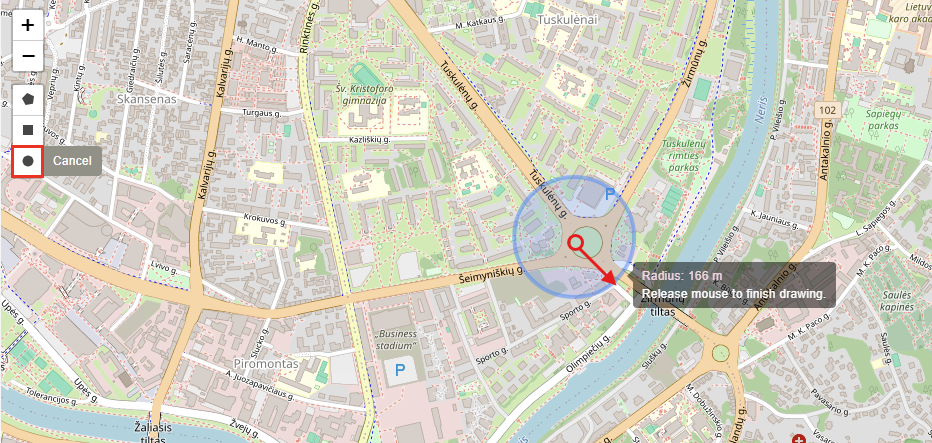
The circle is drawn by clicking and dragging the mouse - which draws the circle radius across the map. Notice that the circle radius is always shown while drawing:
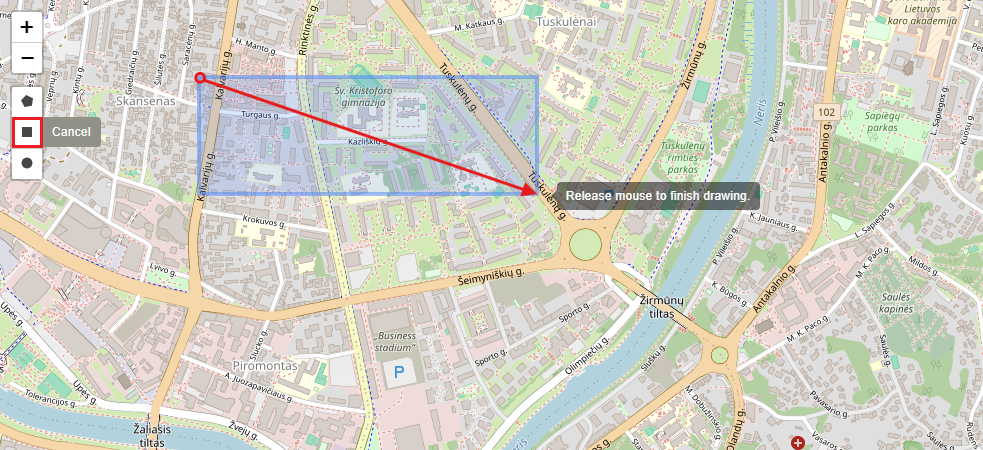
The rectangle is drawn by clicking and dragging the mouse, which outlines the hypotenuse of the rectangle:
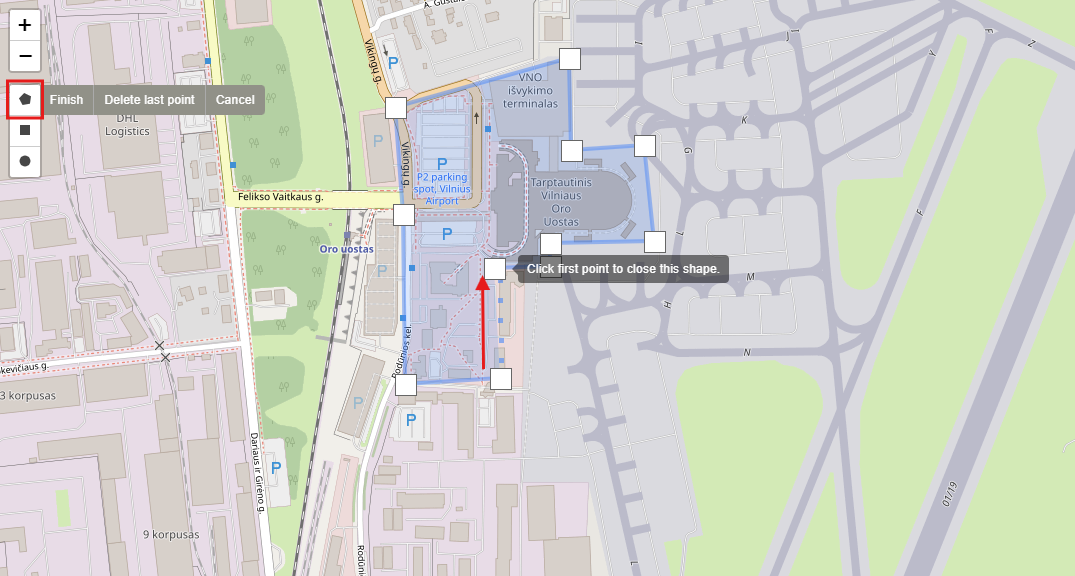
The polygon shape allows you to create a flexible polygon shape from as many points as needed. The polygon is finished when you click on the initial point of the polygon - this action closes the shape:
After finishing drawing the geo-zone shape, a form will pop up in the action sidebar requiring you to fill in some additional information:
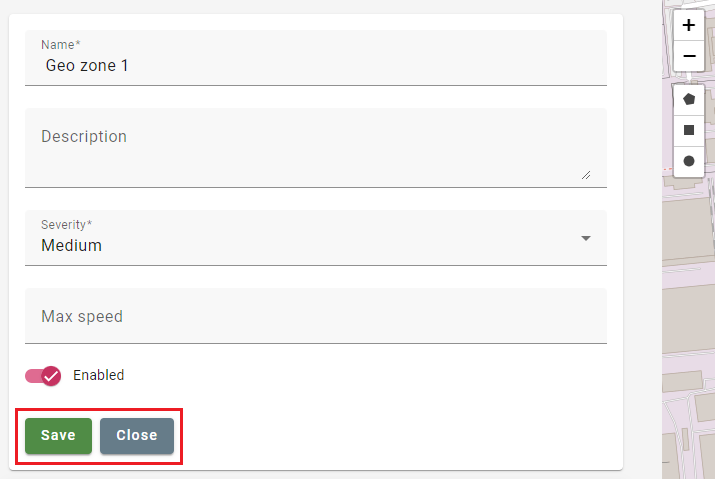
After filling in the extra fields, clicking Save creates a new geo-zone.
All created geo-zones are displayed in a table in the actions sidebar:

If you wish to delete or edit a geo-zone, click the three-dot menu next to one of the geo-zones to view the available actions:
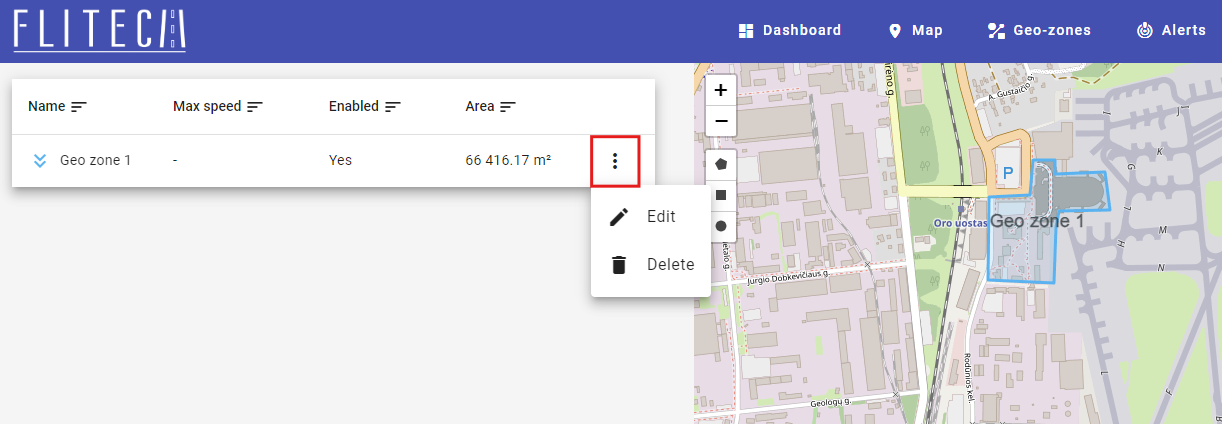
The edit form can also be opened by clicking on the geo-zone shape on the map.
It is also possible to edit the shape of the geo-zone. Transparent points that are displayed in between existing polygon points allow you to add new points to the shape. Double-clicking on any existing point on the polygon will remove it:
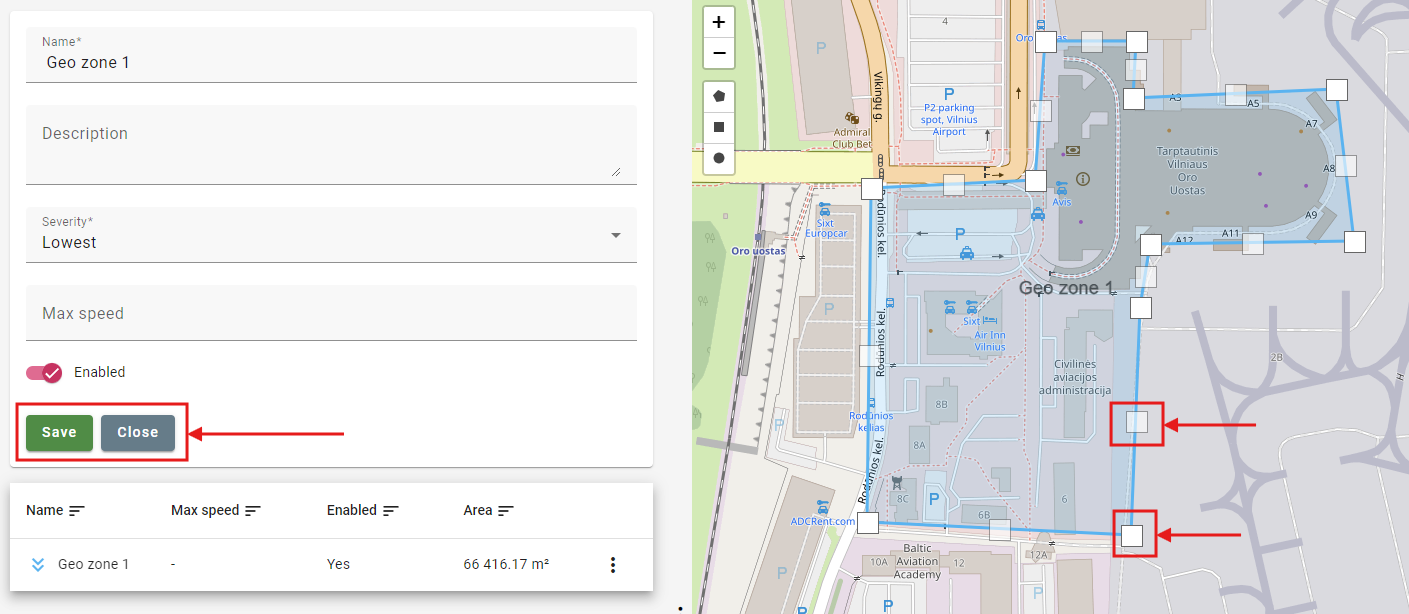
After editing the details and clicking Save, the geo-zone is updated.
Alerts
In this tutorial, we will walk through the process of alert management.
Alerts are reached in the “Alerts” tab in the navigation bar. To start creating alerts, click the create button located at the top left corner of the alerts table:

The create button will take you to the alert create page.
- The alert form allows you to enter the necessary alert details, including:
Alert activity (notifications, email, both, or neither)
Configure whether the alert should notify you of vehicle entrance, exit, or both
Select geo-zones in which the alert will be active (minimum 1)
Select vehicles or vehicle groups to which the alerts will be applied
After filling in the necessary details, clicking the save button will create the alert
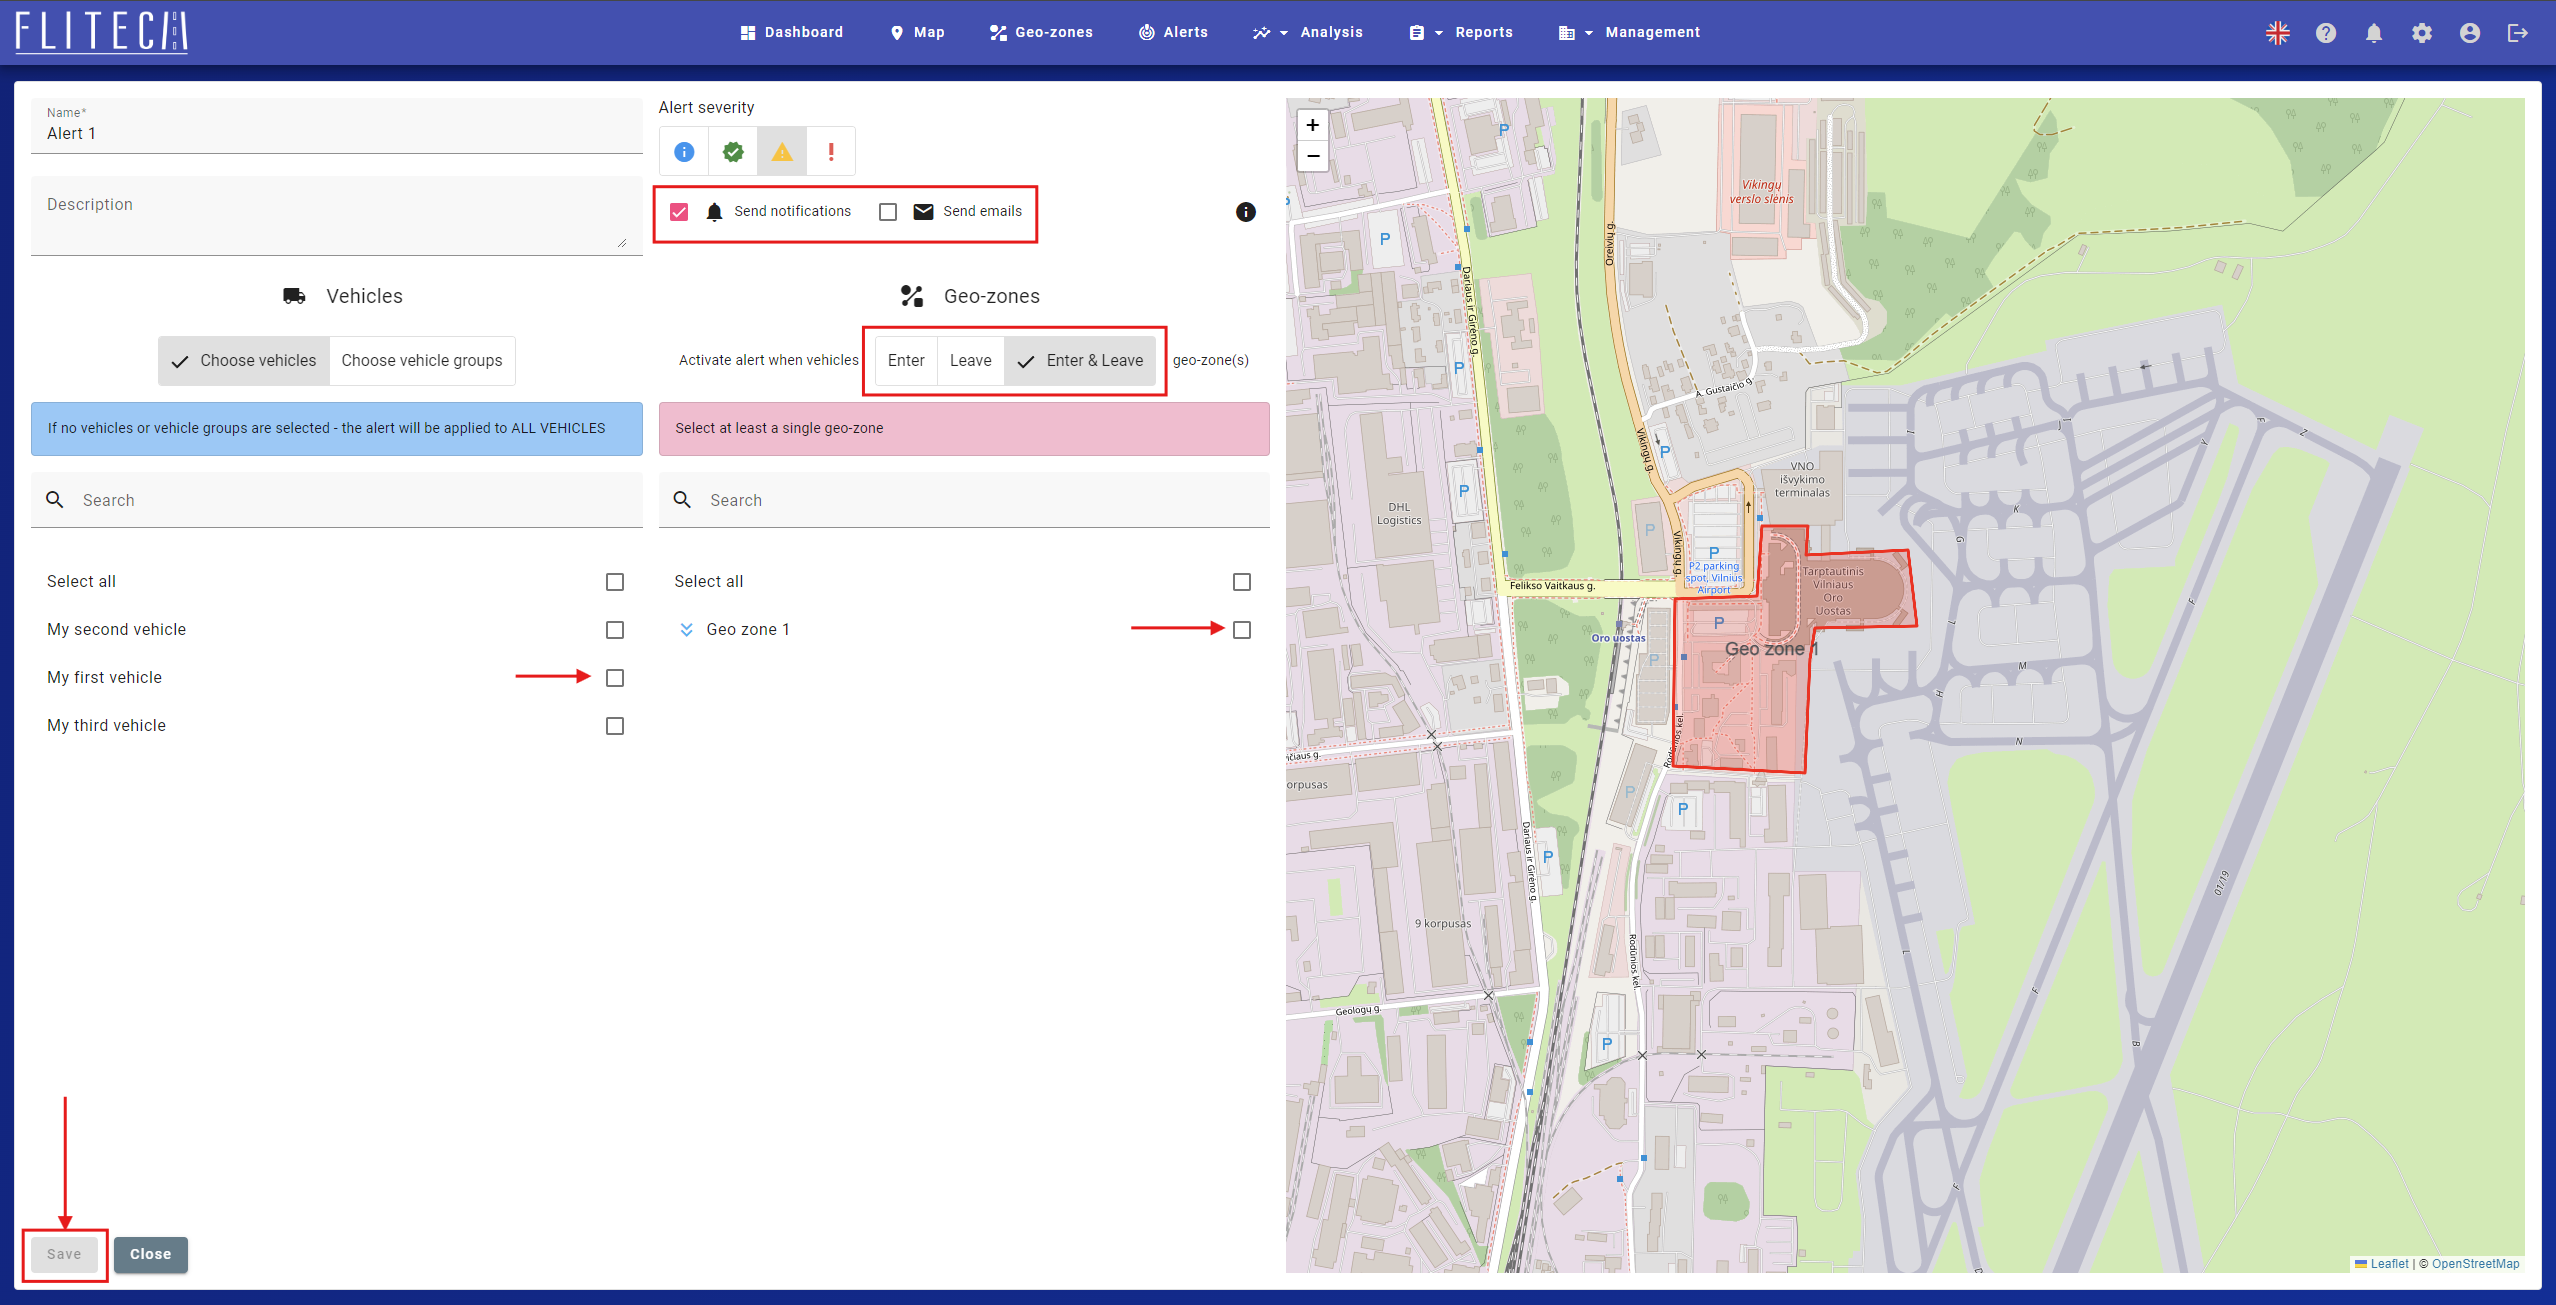
Alerts will notify you of vehicle entrances/exits to/from configured geo-zones with in-app notifications:

External API
In this page we provide all the necesarry information to integrate Fliteca Fleet management solution with your internal systems using our dedicated external API.
To access this functionality, you must have a subscription that grants access to API key management.
If you do not have a subscription, please get in touch with the system administrator here
Note
This functionality is not available by default on base subscription plans.
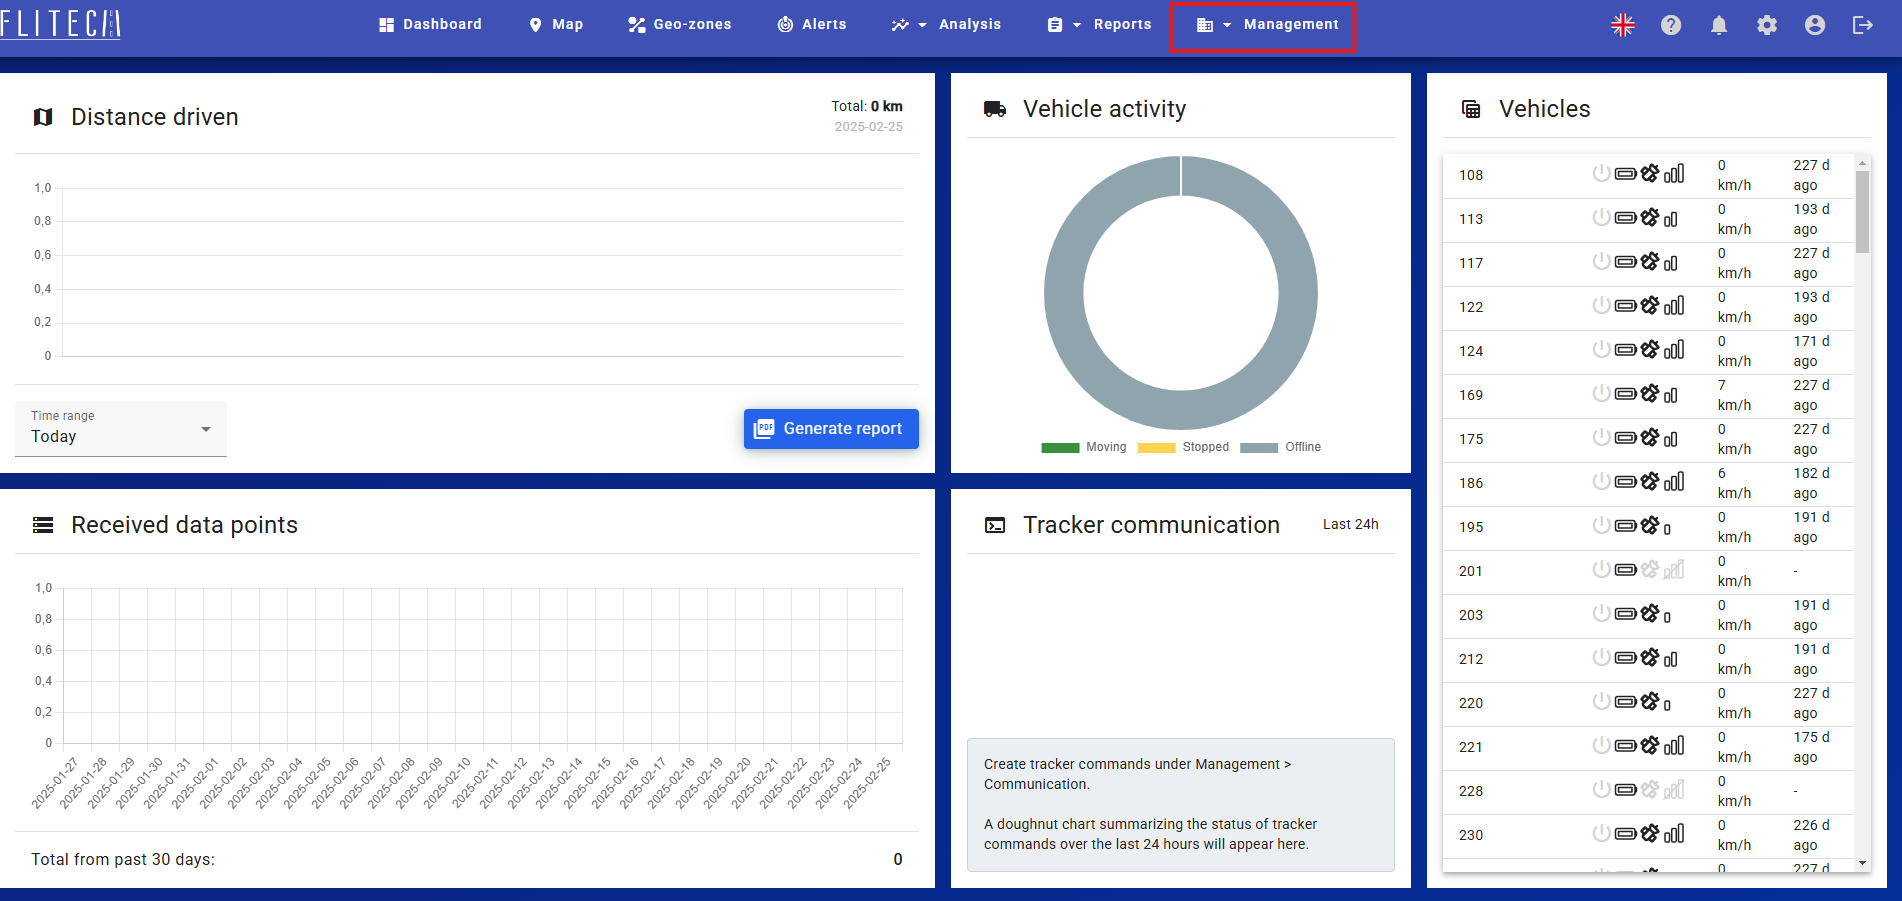
Select the “Management” menu item from the navigation bar in the main program window.
In the expanded menu, choose the “Fleet” option.
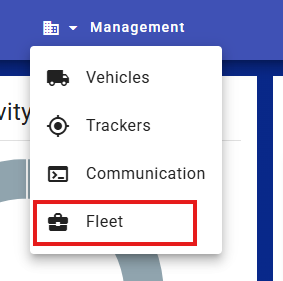
In the newly opened window, select the “External API” menu item.
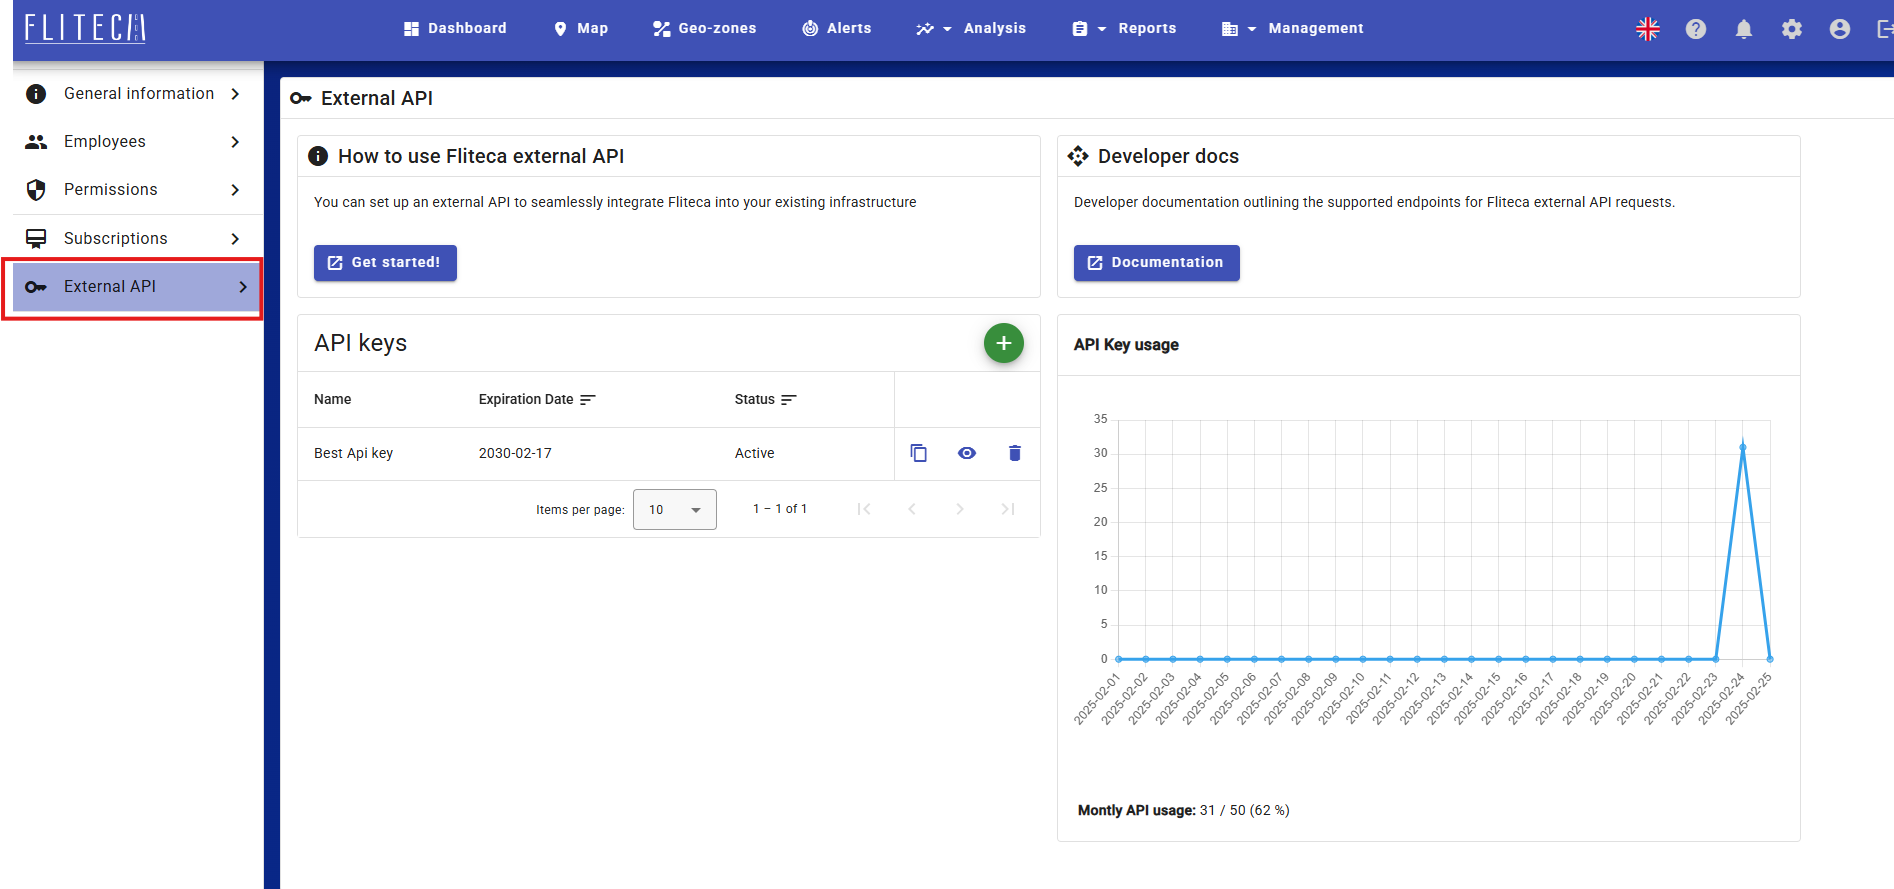
API Key Management Module
- This section contains the API key management module, which consists of four cards:
“How to use Fliteca external API” – A link to the documentation.
“API Keys” – A table of API keys.
“Developer Docs” – Developer documentation.
“API Key Usage” – Monthly API key usage statistics.
To create a new API key, click the plus (+) button in the “API Keys” card.

A dialog box will appear where you need to enter the key name and expiration date. Please note that once the key expires, you will no longer have access to API resources.
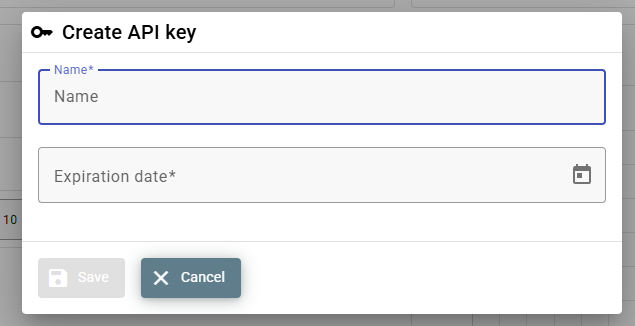
After filling in the required fields, click the “Save” button to save the information.
To copy, view, or delete a generated API key, use the buttons available in the table.

If you select the view button, a pop-up window will appear with the generated key, which you can also copy.

API Request Statistics
This card displays a graph showing all API requests for the current month and the remaining available requests.

External API integration
Exports
- GET /api/v1/exports/gpx/{vehicleId}
- Parameters:
vehicleId (string)
- Query Parameters:
startTime (string)
endTime (string)
- Status Codes:
200 OK – OK
400 Bad Request – Bad Request
401 Unauthorized – Unauthorized
403 Forbidden – Forbidden
404 Not Found – Not Found
500 Internal Server Error – Internal Server Error
- GET /api/v1/exports/gpx/{vehicleId}/extended
- Parameters:
vehicleId (string)
- Query Parameters:
startTime (string)
endTime (string)
- Status Codes:
200 OK – OK
400 Bad Request – Bad Request
401 Unauthorized – Unauthorized
403 Forbidden – Forbidden
404 Not Found – Not Found
500 Internal Server Error – Internal Server Error
Groups
- GET /api/v1/groups
- Status Codes:
200 OK – OK
400 Bad Request – Bad Request
401 Unauthorized – Unauthorized
403 Forbidden – Forbidden
404 Not Found – Not Found
500 Internal Server Error – Internal Server Error
- PUT /api/v1/groups
- Status Codes:
200 OK – OK
400 Bad Request – Bad Request
401 Unauthorized – Unauthorized
403 Forbidden – Forbidden
404 Not Found – Not Found
500 Internal Server Error – Internal Server Error
- DELETE /api/v1/groups
- Query Parameters:
groupName (string)
- Status Codes:
200 OK – OK
400 Bad Request – Bad Request
401 Unauthorized – Unauthorized
403 Forbidden – Forbidden
404 Not Found – Not Found
500 Internal Server Error – Internal Server Error
Track Points
- GET /api/v1/track-points/latest
- Status Codes:
200 OK – OK
400 Bad Request – Bad Request
401 Unauthorized – Unauthorized
403 Forbidden – Forbidden
404 Not Found – Not Found
500 Internal Server Error – Internal Server Error
- GET /api/v1/track-points/latest/{vehicleId}
- Parameters:
vehicleId (string)
- Status Codes:
200 OK – OK
400 Bad Request – Bad Request
401 Unauthorized – Unauthorized
403 Forbidden – Forbidden
404 Not Found – Not Found
500 Internal Server Error – Internal Server Error
- GET /api/v1/track-points/historic
- Query Parameters:
vehicleId (string)
startDate (string)
endDate (string)
pageSize (integer)
pageNumber (integer)
- Status Codes:
200 OK – OK
400 Bad Request – Bad Request
401 Unauthorized – Unauthorized
403 Forbidden – Forbidden
404 Not Found – Not Found
500 Internal Server Error – Internal Server Error
Tracker Commands
- GET /api/v1/tracker-commands/{commandId}
- Parameters:
commandId (string)
- Status Codes:
200 OK – OK
400 Bad Request – Bad Request
401 Unauthorized – Unauthorized
403 Forbidden – Forbidden
404 Not Found – Not Found
500 Internal Server Error – Internal Server Error
- GET /api/v1/tracker-commands
- Query Parameters:
startDate (string)
endDate (string)
- Status Codes:
200 OK – OK
400 Bad Request – Bad Request
401 Unauthorized – Unauthorized
403 Forbidden – Forbidden
404 Not Found – Not Found
500 Internal Server Error – Internal Server Error
- POST /api/v1/tracker-commands
- Status Codes:
200 OK – OK
400 Bad Request – Bad Request
401 Unauthorized – Unauthorized
403 Forbidden – Forbidden
404 Not Found – Not Found
500 Internal Server Error – Internal Server Error
Vehicles
- GET /api/v1/vehicles
- Status Codes:
200 OK – OK
400 Bad Request – Bad Request
401 Unauthorized – Unauthorized
403 Forbidden – Forbidden
404 Not Found – Not Found
500 Internal Server Error – Internal Server Error
- GET /api/v1/vehicles/{vehicleId}
- Parameters:
vehicleId (string)
- Status Codes:
200 OK – OK
400 Bad Request – Bad Request
401 Unauthorized – Unauthorized
403 Forbidden – Forbidden
404 Not Found – Not Found
500 Internal Server Error – Internal Server Error
- PATCH /api/v1/vehicles/{vehicleId}
- Parameters:
vehicleId (string)
- Status Codes:
200 OK – OK
400 Bad Request – Bad Request
401 Unauthorized – Unauthorized
403 Forbidden – Forbidden
404 Not Found – Not Found
500 Internal Server Error – Internal Server Error
- GET /api/v1/vehicles/group
- Query Parameters:
groupName (string)
- Status Codes:
200 OK – OK
400 Bad Request – Bad Request
401 Unauthorized – Unauthorized
403 Forbidden – Forbidden
404 Not Found – Not Found
500 Internal Server Error – Internal Server Error
- GET /api/v1/vehicles/group/tag
- Query Parameters:
groupName (string)
tagName (string)
- Status Codes:
200 OK – OK
400 Bad Request – Bad Request
401 Unauthorized – Unauthorized
403 Forbidden – Forbidden
404 Not Found – Not Found
500 Internal Server Error – Internal Server Error